Associations With ActiveRecord

This post is based on the models I made for my demo API from the last post.

I want to make an app where users can save recipes. They can then have many collections of recipes they can refer to. Let’s call each of these collections a recipe box. Also, a recipe will have lots of different ingredients so a user can easily look up what kinds of ingredients they need to make that recipe.

Simple enough!

First, I want to model out how I want the data to be stored. There are a few things to think about when doing this. Let’s use Twitter for example.

users
id name
1 Amy
2 John

Let’s pretend this is the users table for Twitter. I’m modeling this out in Rails and it is convention to have a plural table name. We know that a user can have many tweets. How would be a good way to store it? What if we added multiple columns to the users table? Would that be a good way?

users
id name tweet_1 tweet_2 tweet_3
1 Amy Hello world Wow another column Getting kinda crowded
2 John What happens if we have hundreds of tweets? This table will get ridiculously big. What's a better way to do this?

As you can see however, this isn’t the best way to do things. Another solution would be to create a separate table for tweets.

tweets
id body
1 Hello world
2 Much better now
3 We can just add more rows

But how can we now associate this tweet table with the users? This is where a join table comes in. We are going to make a user_tweets table that will be our reference for which tweet belongs to which user.

user_tweets
id user_id tweet_id
1 1 1
2 1 3
3 2 2

In this table, the user_id refers to the id of the user table. The tweet_id refers to the id of the tweet table. These are known as foreign keys because they are referencing a row in a different table. Reading this, we can see that Amy has two tweets - tweet with id 1 and tweet with id 3.

Just below, is a diagram of my ActiveRecord models for the demo API. I used the Rails ERD gem for this.

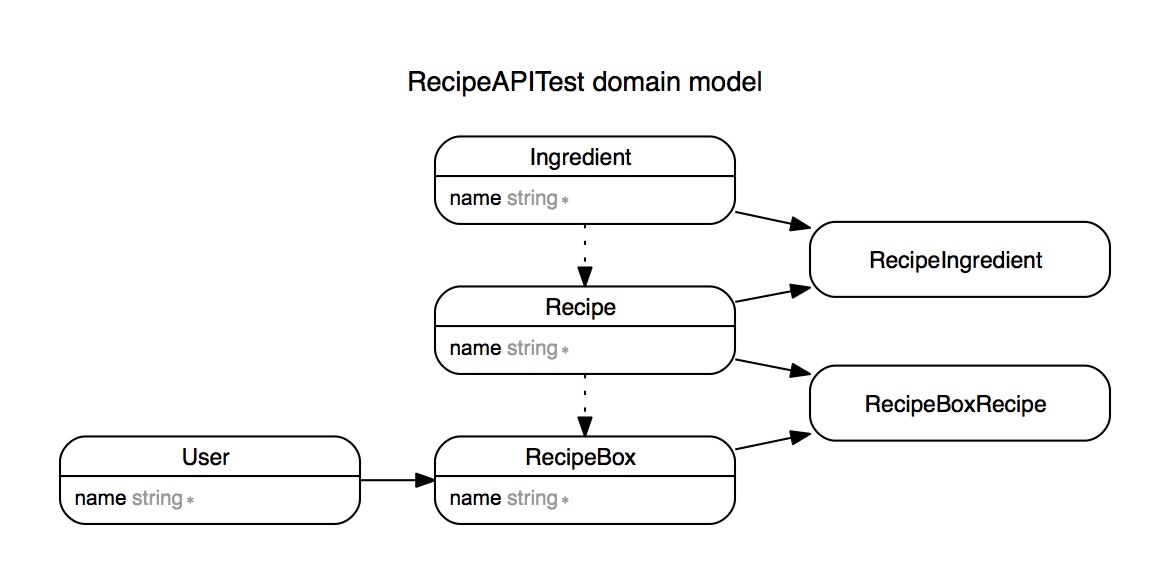
As you can see, a recipe has many ingredients. Likewise, an ingredient will have many recipes. I’ve joined these two tables together through a join table called recipe_ingredients. Just below, you can see how this kind of relationship is defined in your Rails model.

1
2
3
4
5
6
7
8
9
10
11
12
13
14
15
16
class Recipe < ActiveRecord::Base
  has_many :recipe_box_recipes
  has_many :recipe_boxes, through: :recipe_box_recipes
  has_many :recipe_ingredients
  has_many :ingredients, through: :recipe_ingredients
end

class RecipeIngredient < ActiveRecord::Base
  belongs_to :recipe
  belongs_to :ingredient
end

class Ingredient < ActiveRecord::Base
  has_many :recipe_ingredients
  has_many :recipes, through: :recipe_ingredients
end

We use a has_many :through as our model Recipe is matched with the model Ingredient by going through RecipeIngredient. My recipe_ingredients table has a column for both recipe_id and ingredient_id and that is how the two models are connected.

It is a bit of a simpler association between a User and their RecipeBox. A recipe box can only have on user while a user can have many recipe boxes. For this, we will not need a join table. However, a recipe box can contain many recipes and a recipe can also have many recipe boxes. So, we will need a join table for that relation. Here, it is called RecipeBoxRecipe. RecipeBoxRecipe has a recipe_box_id and a recipe_id for its foreign keys.

1
2
3
4
5
6
7
8
9
10
11
12
13
14
class User < ActiveRecord::Base
  has_many :recipe_boxes
end

class RecipeBox < ActiveRecord::Base
  belongs_to :user
  has_many :recipe_box_recipes
  has_many :recipes, through: :recipe_box_recipes
end

class RecipeBoxRecipe < ActiveRecord::Base
  belongs_to :recipe_box
  belongs_to :recipe
end

Now that we have set up these associations, we will be able to call methods like user.recipe_boxes to see all the boxes a chosen user has. We can also choose a specific recipe box and call something like recipe_box.recipes to see all the recipes it contains. Something also interesting to note for Rails is that when we created our tables, we did not have to define which column will be a foreign key. Rails naturally recognizes that the foreign key will be the name of the model with _id added.

ActiveRecord also lets us easily save a row to a table by calling .save on the model.

Let’s say we want to add something to a table.

1
2
3
4
5
@post = Post.new
@post.author = "Bob"
@post.title = "Hello World"
@post.description = "This is a post."
@post.save

Now we have a row that has both a recipe id and ingredient id of 1. Another way to do this is through what is known as mass assignment. This way, we can create this object with a parameter hash instead.

1
@post = Post.create(:author => "Bob", :title => "Hello World", :description => "This is a post.")

Something to think about when using mass assignment are strong parameters. With mass assignment, you can run into the danger where users can modify data they should not be able to.

1
2
3
4
5
private

def post_params
  params.required(:post).permit(:author, :title, :description)
end

This way, the only params that can be modified are the author, title and description.

On RESTful APIs

What is an API?

API stands for Application Programming Interface.

It is an easy way for interacting with another application. For example, I could make a GET request to a website’s API and it would give me back data as a response. There are also other requests you can make to an API that are covered further down. The API is acting as the middle-man between the programmer and the application. The providers of the application’s service would give instructions on how to properly format the requests I make to the API and how I can interact with it. It’s a contract where the API will accept my request, and if it is allowed, will then process it. Having an API gives third-party developers an easy way to use a website’s services. Thus, we can use an existing web application for our own purposes.

For example, let’s say I want to make a web application that has a lot of pictures of cute animals. Where am I going to find all of these cute animals? While I could manually search for them and save them for my website, that seems like a hassle. Instead, I could make use of Reddit’s API to get these cute pictures. Reddit has a subreddit called /aww where users upload cute pictures of animals. I can make a GET request to Reddit’s API, and in return it could give me back a response (in this case, JSON) that contains information from the /aww subreddit including the images that users have been posting.

In this case:

GET https://www.reddit.com/r/aww.json

If I make a GET request to this URL, I will get JSON back and from the response I get, I can also get all sorts of information to use on my cute animal website such as links to the pictures. This is easier than scraping the data directly from reddit.

Other examples of using an API could be to get back weather data. OpenWeatherMap has an API that let’s you easily get back information on the weather. To know which requests give back the responses you want, you can view their API docs. In this case, you would need an API key to make requests. The key would help OpenWeatherMap control how their API is being used. One example could be limiting the number of requests you can make to the API within a certain amount of time.

What is REST?

REST stands for Representational State Transfer.

It is an architectural style that helps with communications between computer systems. It’s a stateless communications protocol as in the state of the client session is not stored server side and HTTP requests happen in isolation. This means that it’s only concern is when a request is made and it does not care for past requests. There are benefits of having a stateless transaction. For one thing, it reduces memory storage and it’s also easier to cache. As the client is not aware of the implementation, it’s also more scalable.

Generally, a RESTful service would be based on HTTP.

RESTful API?

Now, all of the previous examples of API calls are all known as RESTful APIs. Most RESTful APIs use HTTP requests, which are stateless. In the previous examples, I only showed one HTTP request method: GET.

However, there are more and they all do different things.

GET method requests data.

POST method submits data.

PATCH updates data.

DELETE deletes data.

There are more methods, but those are the main ones used. It should also be noted that not all HTTP methods are considered safe. Safe methods are those that do not modify data unlike methods such as - POST, PATCH, DELETE. It isn’t super common to allow unsafe methods because there could be repercussions when manipulating the resource especially if multiple people are doing so at the same time.

Example API

I made a simple demo API, you can see it HERE and play around with it.

Benefits of Giving a Technical Presentation (Some Thoughts!)

Getting ready.


Last August, I had the amazing opportunity to give my first real technical presentation at NYC.rb! (Here’s a link to its event page). I learnt a lot, found a way to give back to the Ruby community, and had a great time.

This whole adventure started when I was exploring using the repository pattern in Ruby - a language whose ecosystem is very much centered around Rails (which does not use the repository pattern). So to aid further understanding of this pattern, I used a lesser-known framework, Hanami, to show how it compares with Rails' ActiveRecord. While there are other ways to force the repository pattern on Rails such as ROM, after reading a blog post by Piotr Solnica, I guess thoughts about the state of the Ruby ecosystem had been lingering in my mind. What is Ruby without Rails? After all, if someone is a Ruby developer, chances are that they are working in Rails. But if a better Rails alternative comes out then isn’t written in Ruby, what is going to happen to the Ruby language? Is Ruby’s future too dependent on Rails? With these thoughts in mind, I thought it would be fun and educational to learn a new framework. And what better way to solidify learning something new then to give a technical talk?

From experience, I’ve found explaining a concept to someone is a great way to test if you have truly understood what you had been learning. By explaining it to someone else, it forces your perspective on the concept to change - from “just making it work” to truly understanding why it works that way. It changes your priority. It’s easy to copy + paste that piece of code from Stack Overflow to just make your app work but after all, I’m learning to be a full-stack developer, not a full-stack-overflow developer. This technical talk was my way of challenging myself to pause for a moment and reflect on why does Rails use ActiveRecord and what are some alternatives to this architectural pattern? In the end, not only would I learn something but I’ll also be sharing knowledge. So it is a win/win on both sides.

The experience of giving a talk really was a great learning experience. I felt I understood the concepts I was talking about a lot deeper than simply just knowing how to implement them. I became more aware of the different kinds of knowledge that exist. Implementing something is different from understanding it. But to implement something well, requires you to really understand what is going on. It gives you choice. When you understand something, you’ll be able to choose the right tool for the job and make an informed decision. This is an important skill to have as a developer when you are faced with many different kinds of applications that might not fit the Rails model well.

Another benefit in giving a technical presentation is that it helps contribute to the community. I love the Ruby community. It was incredibly friendly when I first started learning and I always felt welcome at meetups no matter my skill level. I learnt so much from more experienced developers. Giving a talk is in a way giving back and hopefully somebody does learn something new in turn.

Finally, while this does not directly relate to programming, giving this presentation helped me gain confidence. I was very nervous initially and struggled a lot with imposter syndrome. Could someone really learn something from me? As much as I felt this talk was a challenge to myself to really understand the tools I was working with, it was also a personal challenge. Simply, could I do it? It’s tough when it is your first time getting up in front of an audience of developers, live coding, and then taking questions at the end. It really tests both your technical knowledge and your ability to keep calm under pressure (especially if you had never done something like this before). But all in all, it helped me to be more confident in myself and my efforts. It’s something that I would definitely love to do again.

So to sum up:
1) Giving a presentation helps you learn
2) It gives back to the community
3) It helps build confidence
4) It’s a lot of fun!

My First Ruby Meetup in Japan

I definitely need to brush up my origami skills! (I made the one on the left).


This post is a bit of a train of thought. I graduated from a coding bootcamp back in December and I’m now two months into work life. It was just natural for me to start looking back and reflecting on how my programming journey first began even though I know it is still the beginning!

So, coming from a bootcamp, Ruby is my first programming language. I think one of my favourite things about it is the amazing community. There’s a saying “Matz is nice so we are nice”. I loved the feeling about it. It was so positive and I felt it mirrored this love of programming and learning I had that eventually compelled me to sign up for a coding bootcamp. But as someone that started learning at a bootcamp, I dealt with imposter syndrome. Did I dupe my way past admissions? Do I really belong in the programming world? I did not major in computer science in college. But when I began to embrace this struggle and recognize that yes, learning to code is hard, I began to relax and keep myself open to learning. It was not as though I wasn’t trying hard to learn, but it seemed that my own anxiety and worry kept me from realizing that this struggle is normal and had nothing to do with my fear that perhaps I was just incapable of learning to code. I also began to get involved in the Ruby community and attending local meetups. People are very friendly and willing to help out. In New York, I enjoy going to meetups like NYC.rb and Ruby Roundtable to meet fellow Rubyists and learn something new.

Then, graduation from the bootcamp happened and I found the opportunity to do something that I’ve always wanted to do - go to a Ruby meetup in Japan. Ruby was developed by Yukihiro Matsumoto in Japan and I was curious to see if the Ruby community was different in its birthplace than it was here. The meetup I attended in Tokyo was asakusa.rb. It’s organized by Akira Matsuda who was very friendly and welcoming when I expressed an interest in attending the meetup (:

In a bit of a coincidence I had also just attended If Conference 2016 which was a tech conference related to NYC’s Japanese startup scene. There, I learned that the startup scene in Japan is not huge and unlike Israel and NYC, the culture there is not so friendly towards startups. One particular talk I really enjoyed was Nulab’s Masa about creating a startup community in Fukuoka and the challenges faced in doing so. His enthusiasm really made the talk! He also shared his experiences when organizing Myojowaraku which is a creative tech event in Fukuoka and I learned about the startup visa that Fukuoka recently introduced. So Fukuoka does seem to be more startup friendly. But overall, I got the impression that most people in Japan have a view that working at a startup does not show success as much as working in a big company and so, there is a smaller startup culture in Japan than here in New York. This was interesting to me as I felt a great deal of the Ruby on Rails jobs offered in NYC tend to be for startups.

Anyway so Tuesday night in Tokyo and I was in Shinjuku Electric Street ready to meet some people of Japan’s Ruby community. The meetup started off with a programming session where everybody was working on their own projects. We had an introduction session where I was guided through making an origami Ruby. As seen from my photo above, my origami does need some work. Afterwards, we all went out for dinner (I’ve been dreaming about the food ever since. One of my favourite things about visiting Tokyo has to be the food.) People were super friendly and did not seem to mind that my Japanese was practically non-existent. Some things I learned about Japan’s tech scene was that Ruby is actually more popular than Python which was surprising to me. I was also told that most people that were using Ruby were also hobbyists. People there were amazingly welcoming to me and despite the language barrier, I feel a love of coding really does bring people together. I had an incredibly good time. I look forward to the next time I have another opportunity to visit and will hopefully be able to also bring a better understanding of Japanese (:

TDD Practice: Life and Death of a Cell (Conway's Game of Life)

I got a bit more practice since my last post on just barely touching IntelliJ. I’m currently working on implementing Conway’s Game of Life in Java and I decided to use TDD to help me along the process. I like how it helps me to think on the design of my code. And that I can be sure new methods I write don’t break my previous ones. Right now, I’m going to walk through the process of the cell logic in the Game of Life.

Rules (Taken from Wikipedia)
1) Any live cell with fewer than two live neighbours dies, as if caused by under-population.
2) Any live cell with two or three live neighbours lives on to the next generation.
3) Any live cell with more than three live neighbours dies, as if by over-population.
4) Any dead cell with exactly three live neighbours becomes a live cell, as if by reproduction.

The first test I decided to write was that a cell’s initial state would be dead. (Something nice about using IntelliJ was that it would help auto-import libraries and the auto-completion is really convenient. Also, clicking option+enter brings up available suggestions to fix an error in your code.)

1
2
3
4
5
6
7
public class CellTest {
    @Test
    public void InitialStateisDead() {
        Cell cell = new Cell();
        Assert.assertEquals(cell.getState(), false);
    }  
}

This test would automatically fail. Which is what we expected. The next step is to pass this test in the absolute simplest way. So to make this test pass, we would just make the method state return false.

1
2
3
4
5
public class Cell {
     public boolean getState(){
       return false;
    }
}

Great, so now we have all our tests passing. But what happens if the state of our cell is alive? We need to write a test that can check that.

1
2
3
4
5
6
@Test
    public void CellStateCanChange(){
      Cell changeCellAlive = new Cell();
        changeCellAlive.changeState();
        Assert.assertEquals(changeCellAlive.getState(), true);
    }

The test right now is failing. We need to write a changeState method which is missing right now. While it should make the state of our cell toggle, we are going one small step at a time. I made an instance variable that returns false and made it so our method state would be returning that variable. So the simplest way to just make the test pass would be for changeState to just set the state of the cell as true as you can see in line 7.

1
2
3
4
5
6
7
8
9
public class Cell {
    private boolean state = false;
    public boolean getState(){
       return state;
    }
    public void changeState() {
        state = true;
    }
}

Now however, we want to see if a cell can change from alive to dead. We will write a test that will try to change the state of an alive cell and the state should return false. Of course the test will fail as right now, changeState can only make the state change to true, not false.

1
2
3
4
5
6
7
8
9
10
@Test
public void CellStateCanChange(){
  Cell changeCellAlive = new Cell();
  changeCellAlive.changeState();
  Cell changeCellDead = new Cell();
  changeCellDead.changeState();
  changeCellDead.changeState();
  Assert.assertEquals(changeCellAlive.getState(), true);
  Assert.assertEquals(changeCellDead.getState(), false);
}

To make this test pass, I am going to edit the changeState method. It will check the state of the cell and be able to toggle it.

1
2
3
4
5
6
7
8
9
public class Cell {
  private boolean state = false;
  public boolean getState(){
     return state;
  }
  public void changeState() {
     state = !state;
  }
}

The test passes now. I want to start incorporating some of the rules of Conway’s Game of Life. Namely, the condition where a cell can live onto the next stage. A cell that has two or three neighbours will be able to live onto the next generation.

1
2
3
4
5
6
7
8
9
@Test
   public void CanLiveOnToNextStage(){
     Cell cell = new Cell();
       Cell cell2 = new Cell();
       cell2.nextState(3);
       cell.nextState(2);
       Assert.assertEquals(cell.getNextState(), true);
       Assert.assertEquals(cell.getNextState(), true);
   }

To make the test pass, I’ll create the method getNextState and nextState. nextState determines what the cell’s next state is. It will accept an integer as an argument. The integer is meant to represent the number of neighbours that the cell has. getNextState will be retrieving what the next state is.

1
2
3
4
5
6
7
8
9
10
11
12
13
14
15
16
17
18
public class Cell {
    private boolean state = false;
    private boolean nextState = false;
    public boolean getState(){
       return state;
    }
    public void changeState() {
        state = !state;
    }
    public boolean getNextState(){
        return nextState;
    }
    public void nextState(int i) {
        if(i == 2 || i == 3){
            nextState = true;
        }
    }
}

Now that the tests pass, I’m going to move onto other tests that see what situations a cell wouldn’t be living onto the next generation. Let’s do under-population. If a live cell has fewer than two live neighbours, it will die. By default however, because our nextState is set to false, our tests should pass automatically. But as we want the tests to fail, I set the next state to have neighbours of 3 first. Then, I set it to lower numbers. To clarify, let’s say I did not previously set the state of the neighbours to have 3 first. Then I would end up with a test like this:

1
2
3
4
5
6
7
8
9
@Test
    public void WillDieOfUnderpopulation(){
        Cell noNeighbourCell = new Cell();
        Cell oneNeighbourCell = new Cell();
        noNeighbourCell.nextState(0);
        oneNeighbourCell.nextState(1);
        Assert.assertEquals(noNeighbourCell.getNextState(), false);
        Assert.assertEquals(oneNeighbourCell.getNextState(), false);
    }

These tests would actually be passing. But that would be an inaccurate reflection of what I want the code to do. I need the tests to fail so I can edit the code to account for that. After all, the next state of a cell is by default always going to be false. I will have to write something to make it true and see if it can change to false. So notice the two extra lines I write on the test below.

1
2
3
4
5
6
7
8
9
10
11
@Test
    public void WillDieOfUnderpopulation(){
        Cell noNeighbourCell = new Cell();
        Cell oneNeighbourCell = new Cell();
        noNeighbourCell.nextState(3);
        noNeighbourCell.nextState(0);
        oneNeighbourCell.nextState(3);
        oneNeighbourCell.nextState(1);
        Assert.assertEquals(noNeighbourCell.getNextState(), false);
        Assert.assertEquals(oneNeighbourCell.getNextState(), false);
    }

To pass this, I just need to fill in the else statement of our nextState method.

1
2
3
4
5
6
7
public void nextState(int i) {
        if(i == 2 || i == 3){
            nextState = true;
        } else {
            nextState = false;
        }
    }

I continue to test in this manner. I get the test to pass then I think of more specific scenarios to test to get the test to fail and then I go back to refine the code more. I still need to write the tests for what happens in the event of over-population and how reproduction works.

I also decided to go back to refactor a bit. I began to think that holding the next state of my cell in a variable is a little unnecessary. I delete my getState method as well as the variable. Instead, these are what my methods look like now:

1
2
3
4
5
6
7
8
9
10
11
12
13
14
15
16
17
18
19
20
21
public class Cell {
    private boolean state = false;
    public boolean getState(){
       return state;
    }
    public void changeState() {
        state = !state;
    }
    public boolean nextState(int i) {
        if(i == 2 || i == 3){
            return true;
        } else {
            return false;
        }
    }
    public void next(int i) {
        if(state != this.nextState(i)){
            this.changeState();
        }
    }
}

I do change the tests a little to reflect this change. Some methods after all are now accepting arguments. It does show my tests could have been testing too much and were a little brittle. Generally, I would not want to change my tests to account for this refactoring. This project is still a work in progress but it feels good to familiarise myself with Java, an IDE as well as testing. The final product will also use the Slick2D library for drawing out this game. I might do another separate blog post on how to integrate it with IntelliJ. While Maven did a lot of it for me, there were some native dependencies that were missing and I had to manually put them in.

Hello World in IntelliJ - First Experience With an IDE

I come from a coding bootcamp background (I attended Flatiron School). Being in the web development class, my first language was Ruby and my coding environment was pretty much just Sublime Text (though more recently Atom). With Ruby as a first language, IDEs can seem to be pretty alien. What’s the point? Isn’t everything I need just in a simple text editor? These are the questions I had when Ruby was the only language I knew. While there are Ruby IDEs out there, you can get by with no trouble just using a text editor.

I ran into my first feeling that I needed an IDE when I started learning Java. It was very different from Ruby. I needed to get used to a static language. Arrays that needed to know what size they were, variables to be declared and remembering to compile a program before running it. I admit that my first Java program (a simple shopping cart reader that would get its input from a text file and give a receipt as an output after calculating item totals and tax) was programmed entirely on sublime and while coding, I kept thinking - This feels a lot harder than it should be. After the horrified look I got from a friend when I mentioned I was coding Java on a text editor, he recommended IntelliJ as an IDE to use. And that is where I am now.

So to start off… what is an IDE?

IDE stands for Integrated Development Environment. IntelliJ doesn’t just give a platform for writing code on, but it also contains a compiler, built-in debugging (way better than my beloved binding.pry), and a very helpful autocomplete.

This all seems great!

One of my main issues from my first Java program was just forgetting to compile and so on… it was an extra step that I didn’t need to do with Ruby. However, just getting started on an IDE having never encountered one before has led me to see that there is a learning curve. With a text editor, I could hit the ground running and immediately start writing code. But there is some familiarity that needs to be developed with an IDE and learning one is a challenge in and of itself.

As you can see from the title of this blog post, this is just a simple guide on creating a Hello World program with IntelliJ. (The pictures might look a little bit small but they expand if you click on them.) This post also helps me document my learning progress.

Step 1: Create a new project

When you open up IntelliJ, click on the option to make a new project.

Step 2: Navigate through the options and select the command line app template.

Once you’ve clicked new project, you are given the option to include additional libraries and frameworks. If you click next (because we’re not using any), you’ll get to the template selection page. We’re just making a hello world program so we’ll just pick the command line app template.

Step 3: Name the project and choose its location

I already had a folder called HelloWorld made.

Step 4: Write the code

Selecting the command line template makes the public static void appear automatically. So we just need to fill in the rest. While writing, it was nice to see the auto-complete. It’s helpful to be able to see the methods you have available to you.

Step 5: Running the code

To run the code and see “hello world!” printed out, we just need to hit the green triangle on the top right of the window.

And there you have it, my first attempt at trying to familiarize myself a little bit with the absolute basics of IntelliJ before really diving into it. It was definitely a little strange for me at first, coming over from Ruby for the need of an IDE. But I can already tell that if I had written my Java shopping cart reader with IntelliJ, it would have saved me a lot of time in the long run. Overall, I can tell that using an IDE is a lot more powerful but it does have a steeper learning curve when compared to the text editors that I am more familiar with.

First Forays With Gosu - That One Bouncing DvD Logo

During my free time, I’ve been working my way through Learn Game Programming with Ruby . It’s a pretty fun book and can be picked up: HERE

It uses Ruby and the Gosu 2D game library which makes making simple games pretty easy. I’ve just made my way through the first four chapters which walks you through the creation of a whack-a-mole game (except you are trying to hit a blinking bouncing ruby). It goes through animating your images, keeping score, and how to make a time limit for your game. I really recommend the book so far if you’re just starting out with Ruby and looking for something fun and simple.

Having finished the first project in the book, I decided to do some quick review on what I have learned with Gosu and make that one bouncing DvD logo thing. You know, the one you keep watching to see if it hits the corner of the TV?

If you’re still not sure, check out this clip from The Office that explains it all:

Here’s a gif that shows what my final product looks like:

Note that the actual program runs smoothly. It’s just a bad gif that is not in a perfect loop so the frame rate is terrible.

First things first, we are going to have to make a window appear. To do this, we are going to start off by making a subclass of Gosu::Window. In our initialize method, we are also going to tell Gosu what size we want our window to be. So we use super to pass in the dimensions of the window. Notice that right at the bottom when we call the show method? We didn’t write a method called show but it is included in Gosu.

1
2
3
4
5
6
7
8
9
10
11
12
require 'gosu' # Remember to require gosu!

class BounceDvD < Gosu::Window

  def initialize
    super(800, 600)
  end

end

window = BounceDvD.new
window.show

Right now, when we run the program, a blank window should appear. For the next thing, let’s draw the image of the DvD logo onto the window. So we are going to add a draw method to our code. In the draw method, the first two arguments are going to be the x and y axis our image is going to be placed on. If you look below, we can see that Gosu is going to place our logo 30 px from the left and 30 px from the top (It measures this from the top left of our image, not from image center). The third argument is the z-axis. For example, if we had another logo with a higher z, it will be layered on top of our original logo. Finally, the other two arguments is the scale for x and y. Because the picture I picked has a pretty big size, I needed to scale it down so that it would fit in the window.

1
2
3
4
5
6
7
8
9
10
11
12
13
14
15
16
17
18
19
require 'gosu'

class BounceDvD < Gosu::Window

  def initialize
    super(800, 600)
    @image = Gosu::Image.new('dvdVideo.png')
    @x = 30
    @y = 30
  end

  def draw
    @image.draw(@x, @y, 1, 0.4, 0.4)
  end

end

window = BounceDvD.new
window.show

Once we run that code above, we should open up a window and we can see the DvD logo.

Next, we are going to try to move the logo. To do this, we are going to fill up the update method. In our initialize method, we are going to create two more variables for velocity. It will determine how much our logo will be moving. Then, in update, we will add the velocity numbers to our current x and y value. Basically, the logo’s position in the window will be continuously updating by however much the velocity is.

1
2
3
4
5
6
7
8
9
10
11
12
13
14
15
16
17
18
19
20
21
22
23
24
25
26
require 'gosu'

class BounceDvD < Gosu::Window

  def initialize
    super(800, 600)
    @image = Gosu::Image.new('dvdVideo.png')
    @x = 30
    @y = 30
    @velocity_x = 5
    @velocity_y = 5
  end

  def draw
    @image.draw(@x, @y, 1, 0.4, 0.4)
  end

  def update
    @x += @velocity_x
    @y += @velocity_y
  end

end

window = BounceDvD.new
window.show

However, here we are going to run into a problem. We want our logo to bounce on the screen once it meets the edge. Our program right now is always adding the velocity to our logo’s position so it will eventually just move off the edge of the screen like so.

To fix this, our velocity will have to become negative once it hits an edge. That way, it will bounce back instead of continuing onwards. Whenever the logo hits an edge, we want it to reverse directions. We can tinker around with the update method even more and get this:

1
2
3
4
5
6
7
8
9
10
def update
    @x += @velocity_x
    @y += @velocity_y
    if @x > 800 || @x < 0
      @velocity_x *= -1
    end
    if @y > 600 || @y < 0
      @velocity_y *= -1
    end
  end

The numbers of 800 and 600 come from the window size we had defined in the initialize method. And we also have @x < 0 and @y < 0 to make sure it will bounce on all edges. The velocity gets reversed by multiplying it by -1 to create the bounce. The following gif illustrates the result:

It still isn’t quite right. Remember that our image’s placement in the window is decided by its upper left corner? So notice that in the gif, it actually only bounces on that corner. So while the left and top part of the window looks okay, the bottom and right side shows the logo clipping out of the window’s view. It isn’t what we want. We would like it to actually bounce on the logo’s right side, not just its corner. We can do a little maths and fix this by expanding on the if statement in the update method. Our image size is 120 x 120 so if we subtract the window’s size by that amount, we should be able to find when the logo should bounce. Like so:

1
2
3
4
5
6
7
8
9
10
def update
    @x += @velocity_x
    @y += @velocity_y
    if @x > 800 || @x < 0 || @x > 800 - 120
      @velocity_x *= -1
    end
    if @y > 600 || @y < 0 || @y > 600 - 120
      @velocity_y *= -1
    end
  end


And great! The result should now be bouncing on the edge of the logo. It was a really quick and easy exercise. The full code can be seen: HERE

Hopefully this demonstrates how easy it is to get started with gosu and animating with Ruby.

Simple Calculator, Order of Operations, and Polish Notation

One of the very first exercises I did as a coding exercise was creating a simple (and crappy) calculator. It was very basic and did not need to consider order of operations. Below is a really basic example of what I mean:

0

+

0

0

But what if you wanted to calculate using more than one operation? Or be even more flexible and let a user pass in a string to calculate? In this situation, order of operations becomes something to take note of. When researching this, I stumbled upon polish notation (also called prefix notation) and the use of stacks as a solution to this problem.

Polish notation is a different way to write arithmatic. The operator is placed to the left of the operand. This was initially strange to me because I was used to infix notation. In infix, we place the operator in between the operands we are calculating. I did not realize there was any other way and infix was the most intuitive to me. It’s the more conventional way we read expressions.

An example of infix:
2 + 3

An example of prefix:
+ 2 3

While infix might be easier for me to read, I found that when trying to make a calculator, prefix was easier for a computer. One reason is that the rules of order of operations becomes unnecessary with prefix. When trying to calculate infix, there are a lot of rules to keep in mind.

For example:
(5 - 6) * 7

We need to evaluate what is within the parenthesis first. Also, if there were no parenthesis, we would have to calculate 6 * 7 first as multiplication comes before subtraction. Parenthesis are very necessary in infix as they can change what an expression evaluates to with removal.

The same expression however, when written in prefix does not need parenthesis:
* - 5 6 7

The order in which a prefix is calculated is always going to be conveyed by how it is arranged. All prefix expressions are calculated in the same way. To further elaborate:

With infix, finding the innermost expression to calculate first is difficult. It requires a lot of jumping around in the expression.
((15 / (7 - (1 + 1))) * 3) - (2 + (1 + 1))

But if it was written in prefix:
- * / 15 - 7 + 1 1 3 + 2 + 1 1

This prefix expression is calculated in the same way that our previous simple example (+ 2 3) is calculated. We do not even need to memorize the order of operations. Example below on what I mean.

Calculating Prefix Step by Step:
- Read from right to left
- Look for two operands and their operator and evaluate them

- * / 15 - 7 + 1 1 3 + 2 + 1 1

Now we can evaluate them:
- * / 15 - 7 + 1 1 3 + 2 2

Repeat:
- * / 15 - 7 + 1 1 3 4

Our next two operands and operators are selected again. From right to left, the two operands next to their operator will be:
- * / 15 - 7 + 1 1 3 4
(As you can see, from this example, just calculating prefix in this way does not need a knowledge of order of operations… there’s no jumping around in an expression. You just have to follow one rule)

This is what we have now:
- * / 15 - 7 2 3 4
We can see the next two to caclulate is - 7 2… and so on…
- * / 15 5 3 4
- * 3 3 4
- 9 4
And now…
The answer is 5

I wrote a program in Ruby that calculates prefix. Here’s a snippet of a part of its code (the other methods I didn’t include because I felt they were self-explanatory):

1
2
3
4
5
6
7
8
9
10
11
12
13
14
15
16
def calculate_prefix
  stack = []
  # @arg is the prefix expression
  loopSize = @arg.count
    for i in 0..loopSize
    value = @arg.pop
      if operand?(value)
        stack << value
      elsif operator?(value)
        operator1 = stack.pop
        operator2 = stack.pop
        stack << compute(value, operator1, operator2)
      end
    end
    stack.compact.first
  end

Notice I am making an array called stack. In Ruby, an array can pretty much function as a stack. In other languages, there is an actual stack datatype. Stack is a last-in-first-out data structure. You can make a Ruby implementation of a stack which RubyMonk demonstrates HERE.

Basically the last thing I push into a stack will be the first thing I can pull out. So if using a Ruby array, there are just two array methods I would use to simulate a stack. As demonstrated below.

1
2
3
4
# adding to a stack
  stack << something
# retrieving from a stack
  stack.pop

You can tell I used both of those in my calculating prefix method.

So an explanation of my method: I’m reading the prefix expression from right to left, popping a value from it. If the value is an operand, I will be pushing it onto my stack. Otherwise, if it is an operator, I’ll pop the first two elements in my stack and compute them before pushing them to the stack again.

You can tell this is a lot easier than if I were to calculate infix directly.

Prefix might not be the easiest way for me to read an expression but it makes it easier for me to deal with coding a simple calculator. It’s convenience over convention.

Reference:
https://en.wikipedia.org/wiki/Polish_notation

Some TDD Practice

Today I’m going to be practicing my TDD by implementing a set in Ruby using arrays. While the Set class in Ruby uses hashes as storage for various reasons, this is just for practicing a TDD way of coding and also practice for writing tests in RSpec. So I’m not trying to demonstrate a great way of implementing sets or that this is a better way to do sets (spoiler: It’s really not).

Some things to know about Sets:
- Order doesn’t matter (unordered)
- Contains unique values

So the TDD steps… you would want to write tests first and let that guide how you write your code. You would first write a simple test, run it, see it fail and then write minimal code to make it pass (The simplest way you can make it pass). Then you move on to write the next test.

First things first, we are going to write a test. We are going to say what the test is describing. It will be something like this:

1
2
3
describe Set do

end

Now we are going to think about what kind of method we want the set to have.

For a quick example, let’s say you want to convert the set into an array. So we are going to write a test for that.

1
2
3
4
5
6
7
8
9
10
describe Set do

  describe "#to_array" do
      it "returns an array of all elements in the set" do
        @set = Set.new([1])
        expect(@set.to_array).to contain_exactly(1)
      end
  end

end

Note: This test is failing

(You can ignore the number “3)” there. I screenshotted the fail message only after I finished this exercise so I already have a couple tests written)

As we haven’t really written anything, the test will fail when we run it which is exactly what we want. Now we have to write some code to make the test pass.

1
2
3
4
5
6
7
8
9
10
11
class Set

  def initialize(array)
    @array = array
  end

  def to_array
    @array
  end

end

With this, the test now passes. Great!

Now, we can add more stuff in. Let’s write another test to make sure only arrays can get passed as arguments. As Ruby is not a type language, we cannot specify what data types we accept as an argument.

1
2
3
4
5
it "accepts only an array as an argument" do
    expect(Set.new([1,2,3]).to_array).to contain_exactly(1,2,3)
    expect(Set.new(1).to_array).to contain_exactly()
    expect(Set.new("a").to_array).to contain_exactly()
end

The test expects that if the argument is not an array, a set is made but it will be an empty set. It’s important to note that our task is to write tests that fail. So even though the first expect line we write will pass, the other two will not.

To make this next step pass:

1
2
3
4
5
6
7
def initialize(array)
  if array.class != Array
    @array = []
  else
    @array = array
  end
end

Now we can worry about one of the definitions of a set - that it contains only unique values. And we can write a test for that.

1
2
3
it "will create a set with unique elements" do
    expect(Set.new([1, 1, 2]).to_array).to contain_exactly(1, 2) 
end

To make this pass, we can call .uniq on the argument like so:

1
2
3
4
5
6
7
def initialize(array)
  if array.class != Array
    @array = []
  else
    @array = array.uniq
  end
end

.uniq might not be the best way to do things, but it is important to keep in mind that at the moment, we are just concerned with doing the minimal to make the test pass.

I won’t go through each and every one of my tests but eventually I found myself creating new sets for each test. So in my test file, I ended up doing:

1
2
3
4
5
before :each do
  @shortset = Set.new([1])
  @mediumset = Set.new([1, 2, 3, 4, 5, 6].shuffle)
  @mediumset2 = Set.new([4, 5, 6, 7, 8, 9].shuffle)
end

This way I won’t have to keep making new tests. Before each means that before each test, that block of code will run. So less repetition! I added the .shuffle because sets are not ordered. Before that, I had put in arrays in numerical order and didn’t realize some tests actually failed when numerical order was not in place. Ideally, I think something I would change are the names of the sets as they aren’t very descriptive. There’s also a bit of refactoring to be done but the idea of TDD is to do the minimum to pass the tests and then write more tests that you expect to fail.

Overall, there’s still some refactoring to be done but I quite like the practice I got with writing tests before the actual coding. I like TDD because it forces you to think before you code. You have to think about what you will be doing. And once the tests pass (there really is no better feeling…), you know that your job is done.

I’m still tinkering around with it (with refactoring and such) but the full code can be viewed on github: HERE

A Refactoring Process

For my final project, my group members and I were creating an app that would track prices of a selected item over time. Shoppers could add their items to a closet and “follow” other fellow shoppers. So there was a little bit of a social media aspect to it. This was tracked by an activity feed. Initially, I was just concerned with getting it working and because of that, my view really realllyyyy suffered.

Check out all this logic in my view:

1
2
3
4
5
6
7
8
9
10
11
12
13
14
15
16
17
18
19
20
21
22
23
24
25
26
27
28
29
30
31
32
33
34
35
36
37
38
39
40
41
42
43
<% @user.activity_feed.each do |activity| %>

          <br><br>
          <strong>
            <% if current_user.username == activity.user.username %>
                You
            <% else %>
                <%= link_to activity.user.username, activity.user %>
            <% end %>
          </strong>
          <br>
          <% if activity.trackable_type == "Closet" && activity.action == "create" %>
              <em class="text-muted">created closet </em> <%= activity.trackable_name %><br>
              <%= link_to closet_like_path(user_id: current_user.id, id: Closet.find_by(id: activity.trackable_id)), method: :put do %>
                  Like:
                  <%= activity.user.closets.find_by(name: activity.trackable_name).get_likes.size %>
              <% end %>

          <% elsif activity.trackable_type == "Closet" && activity.action == "destroy" %>
              <em class="text-muted">deleted closet </em> <%= activity.trackable_name %>


          <% elsif activity.trackable.class == Item && activity.action == "create" %>
              <em class="text-muted">Added</em> <%= activity.trackable_name %>
              <em class="text-muted">to</em> <%= activity.trackable_source %><br>
              <%= link_to like_item_path(Item.find_by(id: activity.trackable_id)), method: :put do %>
                  Like:
                  <%= activity.user.items.find_by(name: activity.trackable_name).get_likes.size %>
              <% end %>

          <% elsif activity.trackable.class == Item && activity.action == "destroy" %>

              <em class="text-muted">Deleted</em> <%= activity.trackable_name %>
              <em class="text-muted">from</em> <%= activity.trackable_source %>

          <% elsif activity.trackable.class == User && activity.action == "create" %>
              <em class="text-muted">followed</em> <%= activity.trackable.username %>

          <% elsif activity.trackable.class == User && activity.action == "destroy" %>
              <em class="text-muted">unfollowed</em> <%= activity.trackable.username %>
          <% end %>

      <% end %>

and… congratz. You made it to the end. It’s kinda gross and awful. So let’s think about how to fix that. First off, the activity feed was living in the boards index. I decided to move it over to a partial so the boards index.html.erb page now would just show this:

1
 <%= render partial: 'boards/activity_feed', locals: {user: @user}%>

But that still doesn’t solve all that logic in the view! So right now I’m thinking that I require a view object of some sort to handle the logic…

One issue that cropped up is the styling. When a user adds an item to a closet, they should get a message that would kinda look like this:

added mediocre rubber pants to whatever closet

How was I supposed to selectively add styling to a whole message?

So at first I thought oh great all I have to do is put this in the view object:

1
2
3
4
5
6
7
8
9
10
11
12
13
14
15
16
17
18
19
20
21
22
23
24
25
26
class ActivityFeed

  def self.message(activity)
   if activity.trackable_type == "Closet" && activity.action == "create" 
      "<em class = 'text-muted'>created closet</em> #{activity.trackable_name}" 

      elsif activity.trackable_type == "Closet" && activity.action == "destroy"
      "<em class = 'text-muted'>deleted closet</em> #{activity.trackable_name}" 


      elsif activity.trackable_type == "Item" && activity.action == "create"
      "<em class = 'text-muted'>added</em> #{activity.trackable_name} <em class = 'text-muted'>to</em> #{activity.trackable_source}" 
      
      elsif activity.trackable_type == "Item" && activity.action == "destroy"
      "<em class = 'text-muted'>deleted</em> #{activity.trackable_name} <em class = 'text-muted'>from</em> #{activity.trackable_source}"

      elsif activity.trackable_type == "User" && activity.action == "create"
      "<em class = 'text-muted'>followed</em> #{activity.trackable.username}" 
  
      elsif activity.trackable_type == "User" && activity.action == "destroy"
      "<em class = 'text-muted'>unfollowed</em> #{activity.trackable.username}"
      
  end
end

end

and then all I have to do is call html_safe on the partial

1
2
3
4
5
6
7
8
9
10
11
12
<%@user.activity_feed.each do |activity|%>
    <br><br>
    <strong>
    <% if current_user.username == activity.user.username %>
    You
    <%else%>
   <%= link_to activity.user.username, activity.user %>
   <% end %>
  </strong>
   <br> 
    <%=ActivityFeed.message(activity).html_safe%>
<%end%>

But…. wait up, we don’t want to have any html in our view object. It’s kinda icky. One of the points of the view object is to separate the html from the logic.

But the styling was giving me a lot of issues. How could I make sure that only some text remained muted when I was getting back an entire string?

The solution for me was to add more methods into my view object. And that’s ok.

1
2
3
4
5
6
7
8
9
10
11
12
13
14
15
16
17
18
19
20
21
22
23
24
25
26
27
28
29
30
31
32
33
34
35
36
37
38
39
40
41
42
43
44
45
46
class ActivityFeed

  attr_accessor :activity

  def initialize(activity)
    @activity = activity
  end

  def actionmessage
    if activity.trackable_type == "Closet" && activity.action == "create"
      "created closet"

      elsif activity.trackable_type == "Closet" && activity.action == "destroy"
      "deleted closet" 

      elsif activity.trackable_type == "Item" && activity.action == "create"
      "added" 
      
      elsif activity.trackable_type == "Item" && activity.action == "destroy"
      "deleted"

      elsif activity.trackable_type == "User" && activity.action == "create"
      "followed" 
  
      elsif activity.trackable_type == "User" && activity.action == "destroy"
      "unfollowed" 
    end
  end

  def subject
    activity.trackable_name
  end

  def preposition
    if activity.action == "create"
      "to"
    else
      "from"
    end
  end

  def closet
    activity.trackable_source
  end

end

I also added an attribute accessor to lessen the repetition in the partial when I found myself re-typing ActivityFeed.trackable_type one too many times. So this is what the partial looks like now:

1
2
3
4
5
6
7
8
9
10
11
12
13
14
15
16
17
18
19
<%@user.activity_feed.each do |activity|%>
<% activityview = ActivityFeed.new(activity) %>
    <br><br>
    <strong>
    <% if current_user.username == activity.user.username %>
    You
    <%else%>
   <%= link_to activity.user.username, activity.user %>
   <% end %>
  </strong>
   <br> 
    <% if activity.trackable_type == "Item" %>

      <em class = 'text-muted'><%=activityview.actionmessage%></em> <%=activityview.subject%> <em class = 'text-muted'> <%= activityview.preposition %> </em><%=activityview.closet%>
    <% else %>
      <em class = 'text-muted'> <%=activityview.actionmessage%></em> <%=activityview.subject%>
    <% end %>

<%end%>

It’s already looking a lot better, half the size it was before and way more readable.

Refactoring is definitely a process for me and it involves many little edits along the way.